I printed these out for a local furniture store. The pen cup dresser is a dollhouse model by Foogleman18 and the couch is a 3d render asset shared for free. My local veterinarian is unrelated but had the prettiest business card in my wallet.
The pen dresser is printed in wood filament and then painted with MinWax mahogany gel stain. I tried to keep in the direction of the layer lines to have a wood grain appearance. You can probably gel stain any PLA though, the wood filament is mostly for the novelty and gel stains are designed to lay on top of less absorbent surfaces than other wood stains... its more like a transparent paint. It helps that the wood filament is a tan/brown wood color though and most importantly of all it is what is on hand.

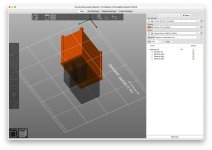
The dresser was printed upside down, to make the voids in the dresser for the pens I used the "add negative volume shape" option in PrusaSlicer to make 3 rectangles to be carved out of the model. This was very quick and easy compared to what the couch needed so it's my preferred method when possible.
Supports were used inside the pen holes to limit the rough surfaces to the inside bottom of the print where they cannot be easily seen. Alternatively this could have been printed right-side-up and had the supports on the bottom side which would have used less support material overall.
For the couch I used this 3D model, which is meant for rendering rather than printing. This required a lot more manipulation to print than the dresser but it what the client liked most. There are already much more simple 3d printable couch-business-card-holder's on thingiverse so it's not the first time this has been done, but we can add a new style to the collection.
Since it was made for rendering the file is extremely high resolution and includes texture files which will be not needed for a print, total download was 1.8gb!
The STL file was imported into the Free and Open Source software Blender. Just the mesh is 293mb and there was a photography slope and lights included in the model which needed to be removed for printing. Blender was put into edit mode and those geometries were selected and removed. The couch is still way to high of resolution for printing or working with it efficiently. This is the wireframe view and it almost looks solid because there are so many triangles.
I used the "un-subdivide" feature of blender to reduce the polygons of the model. I eventually got the model down to about 30mb which was more reasonable to work with but enough resolution to not really notice on a 3d print.
The file is still unfortunately not suitable for 3d printing because it has non-manifold edges meaning they are not fully enclosed. For example when I select the tufted back of the couch you can see it's not really connected to the buttons and rest of the couch. Each seat cushion is also it's own independent mesh. When you try any slice files like these you will get end up with strange but ultimately unprintable results as it will interpret those meshes as thin objects like a cape around the 3d model rather than the actual physical object, it then decides it's too small to print and ignores it leaving big holes all over the place.
To fix this, the mesh imported and repaired via the repair mesh tool in fusion360. I previously have used the free software MeshMixer to do this step but autodesk gobbled it up and put inside fusion360 so now I just do it in there. I suspect a lot of this could have been done with the 3d printing add-on in blender but I am more familiar with Fusion360 for this kind of retopologizing of the mesh. I used the "rebuild" option for the repair and chose to have it do it accurately but otherwise on the default allocations for number of triangles used.
I made the negative space for the business cards here in fusion and then used then used it as a cutting tool to remove the space for the business cards. I did this step in Fusion360 this time because the resin 3d printing software does not feature a negative space tool and I cannot use prusaslicer for my particular resin printer.
I export the mesh from Fusion360 with the new slot for business cards included and corrected geometry. Into Chitubox to slice for printing on the Elegoo Saturn resin 3d printer, the model is tilted to provide an smaller surface area on the FEP film. I used medium sized supports that were auto generated. I printed in black resin so it would not need additional post processing but if there was more time I would probably give it a coat of glossy black enamel paint as well for an even more uniform coloration.